
Ready to shine brighter than those birthday candles? It’s time to get your sparkle on and blind every person with just a single royal wave like the queen you are.
Glitter birthday nails are your go-to accessory to glamourize your special occasion. Whether it’s a full-blown sparkle overdose or an understated shimmer, these nails shriek, ‘I’m the main character.’ So, let’s make your glitter birthday nails as bedazzling as a ’90s disco ball at a club. Glitter up! It’s your time to shine!
10 Glamorous Birthday Nails For Your Special Day
These glitter birthday nail ideas are the best way to shine on your big day! Whether you prefer regular or long-wearing acrylic glitter birthday nails, these brilliant designs unleash your inner goddess.
1. Glitter Accents
A timeless design with a chic upgrade. This nail trend that blends soft creme with dazzling glitter creates a look so glamorous that you’ll be going viral for your nails on your birthday!
Materials:
- Base Coat
- Nail Polish Of Your Choice
- Fine Glitter or Glitter Polish
- Sponge
- Liquid Latex (or Duct Tape)
- Clean-up Brush
- Top Coat
Techniques:
Start by applying the creme polish to your nails and let them dry. Paint on the glitter nail polish on your accent nails or apply a clear polish on them and dip it in fine glitter for good coverage. Top off with a shiny top coat, and clean up the edges to show off your glitter birthday nails!
Pro Tip:
- When using glitter-based polish, apply a thin coat on your nails, protect the skin surrounding your nails with liquid latex or duct tape before using a sponge and dabbing the glitter polish on your nails. This way, you’ll achieve maximum glitter without needing to apply several coats.
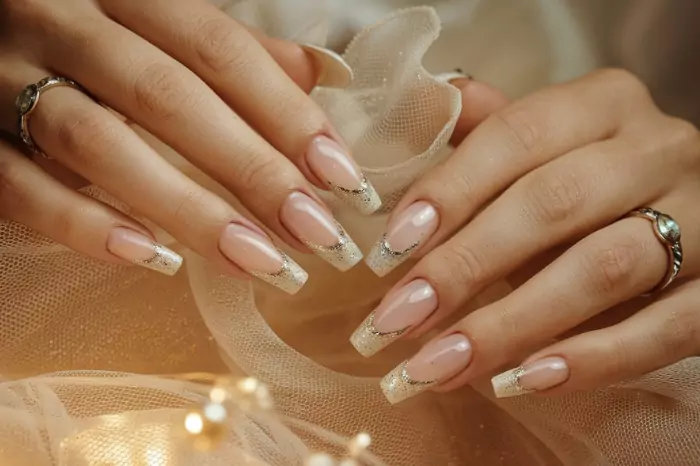
2. Snazzy French Tips
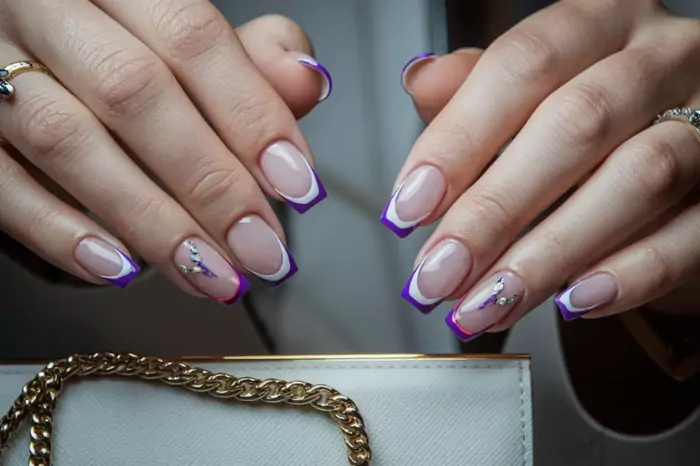
Iconic yet simple glitter nail design. So iconic, Selena Gomez went viral for her black and white French tips. This design has been around since the dawn of time. Its simplicity and elegance made it a status symbol for wealthy people. Why not add a classic sparkly twist to it, then?
Materials:
- Base Coat
- Nail Polish of your choice
- Glitter Polish or Loose Glitter
- A detail brush
- Clean-up brush
- Top Coat
Techniques:
Paint your nails with a polish of your choice and let them dry. Use a detailed brush to either draw on the tips with a clear polish and dip it into fine glitter for a glittering edge or apply glitter polish onto the tips. Seal the shine with a glossy top coat, then tidy up the edges with a precision brush for a smooth, standout finish.
3. Iridescent and Darkness
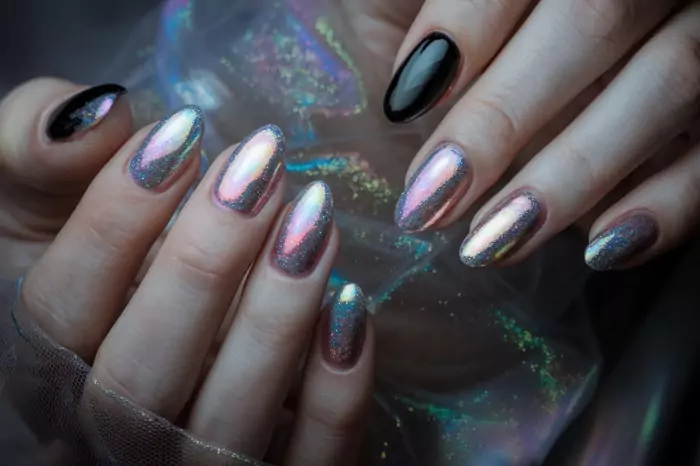
Want nails that feel like you’re wearing unicorn skin? How about trying iridescent? Using glitter iridescent and black nail polish combined makes for a mesmerizing, edgy vibe that’s equal parts glam and mystery.
Materials:
- Base Coat
- Black Polish
- Iridescent Polish
- A detail brush
- Clean-up brush
- Top Coat
Techniques:
Coat your nails in shimmery iridescent polish and allow them to dry. Use a detail brush and some black polish, and let your creativity run wild! Draw whimsical squiggles, frolicking circles, sparkling stars, or whatever your imagination can come up with. The options are limitless as your creativity! Don’t forget to seal it all with a glossy top coat for a fine finish.
4. Anti-Nerd Geometric
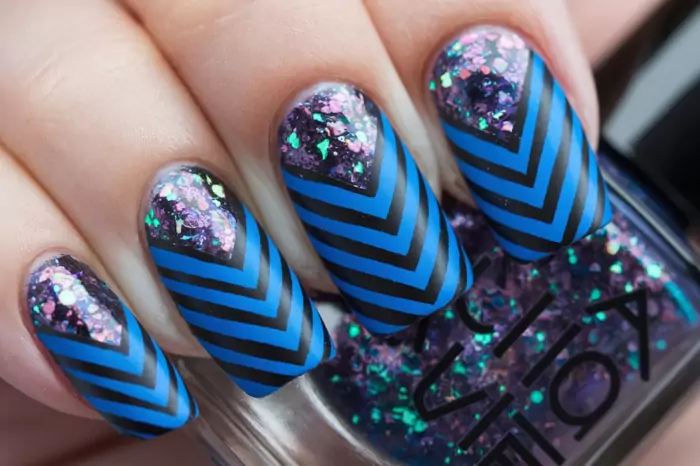
I’m sure you liked mathematics in school if you love geometric nail art. But what if sharp lines meet dazzling sparkles? It’s the perfect blend of edge and glam and a splendid idea for your glitter birthday nails. Whether you prefer your glitter birthday nails short or long, the geometric design will look equally stunning.
Materials:
- Base Coat
- Nail Polish Of Your Choice
- Glitter Polish
- Nail Vinyl or Striping Tape
- Clean-up Brush
- Top Coat
Techniques:
Paint your nails with creme/glitter polish and allow them to dry. Put vinyl stripes on your nails before applying a second coat of glitter/creme polish over the stripes. Lastly, remove the strips and add a glossy top coat. Use a clean-up brush to touch up any areas, and voilà! Those are beautiful glitter birthday nails!
Pro tip:
- Apply a quick-dry top coat (or gel) and let that dry before you stick on the vinyl to prevent the polish underneath from coming off.
- After applying the nail polish on top of the vinyl, take the strips off quickly for a sharp, clean line.
5. Twinkling Frosted Tips
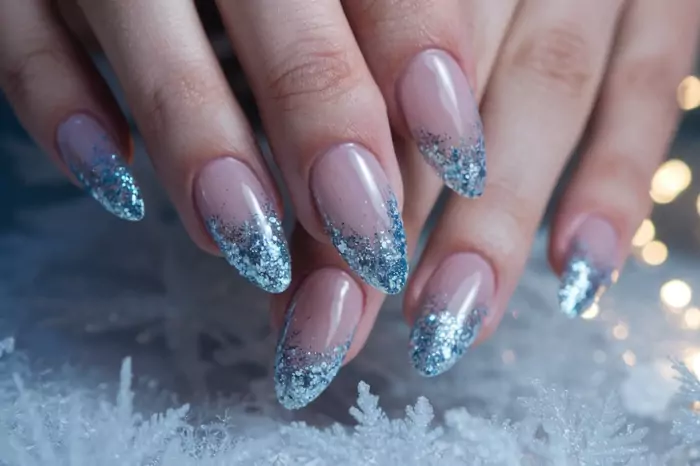
Glitter-frosted tips are the perfect design for a winter-themed birthday party. This chic design combines icy shimmer with bold edges, making it look as though your nails got frostbite. Thankfully, it won’t spread down your fingers.
Materials:
- Base Coat
- White Polish
- A Dark-Toned Polish
- Fine or Chunky White Glitter
- Sponge
- Liquid Latex (or Duct Tape)
- Clean-up brush
- Top Coat
Techniques:
Start by applying a chic white base to your nails and let them dry. Apply liquid latex or duct tape around your nail for protection before getting a sponge and merging a rich dark color for a classic ombre look. Add a dash of white at the fingertips, followed by a clear coat, before immersing them in blindingly fine glitter. Add some glitter in the middle with the sponge, add some chunky glitter for drama, remove the tape/latex, and cap it with a glossy finish for your icy glitter nail design!
Pro Tip:
- When sponging the polish, layer the two polishes on top of one another on the sponge to get a seamless finish when you dap it on the nails.
6. Broken Glass K-Nails
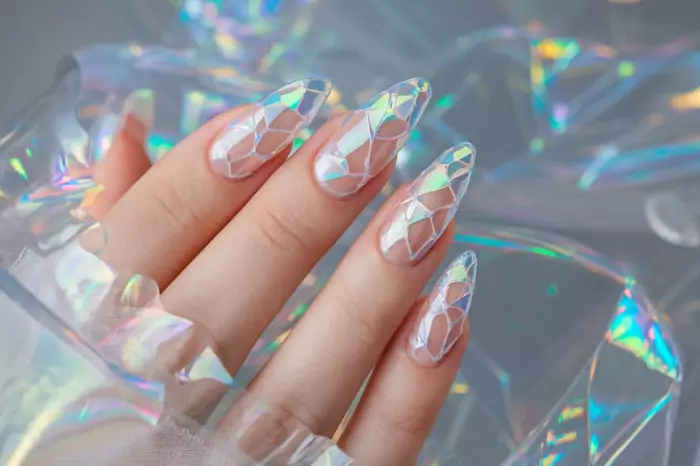
This nail design is shattering, literally. If you want a subtle sparkle but still want your nails to stand out, the Korean broken glass iridescent nail trend is the perfect style for you. Creating a kaleidoscope of colors that shift with every move, this is the cute birthday nail idea you’re looking for to match your love for Korean culture.
Materials:
- Base Coat
- Black Polish
- Iridescent foil or Glitter Flakes
- Scissors
- Tweezers
- Clean-up Brush
- Top Coat
Techniques:
Start by painting your nails with glossy black polish and drying them. Then, cut the iridescent foil into stylish, bite-sized shards. Coat the nails with a clear coat, and position each piece of foil artfully, leaving a slight gap for an eye-catching broken glass look. Clean up edges and seal with a glossy top coat for a dazzling, high-shine finish!
7. Symmetrical Spangle
Let’s get meticulous with our nail designs. You thought the nail designs above were tricky; how about placing individual glitters on your nail to create a complex design? This is the most creative and time-consuming way to turn your manicure into a bedazzling masterpiece!
Materials:
- Base Coat
- Nail Polish Of Your Choice
- Big Chunks of Glitter
- Toothpick
- Clean-up Brush
- Top Coat
Techniques:
Make your nails shine with brilliant glitter! Color them in coordination with the glitter color and allow them to dry. Then, apply a clear polish before strategically positioning each chunky glitter with a toothpick and sealing it with a glossy finish for a dazzling, shimmering manicure!
Pro tip:
- Start from the cuticle side and make sure to work in sections so that the clear coat doesn’t dry out until you reach the tip of your nail.
8. Sparkling Outlines
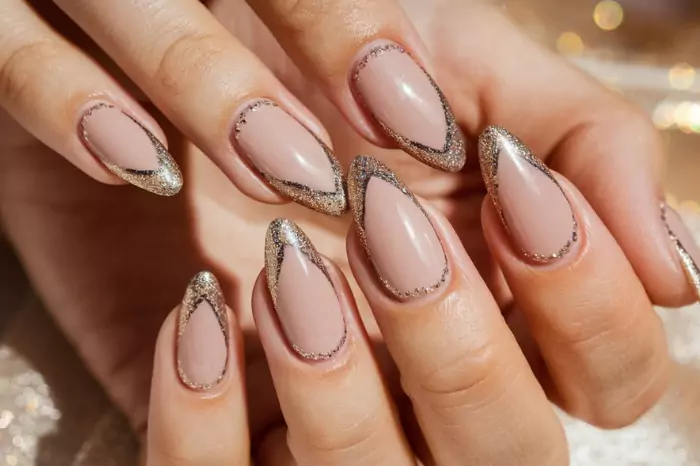
This is just French Tips Pro Max. The glitter outline design is an old trend that’s equally subtle and stunning. Maybe using an elegant palette like rose gold glitter birthday nails with glitter outlines will bring that spark of wildness.
Materials:
- Base Coat
- Nail Polish Of Your Choice
- Glitter Polish
- A Detail Brush
- Clean-up Brush
- Top Coat
Techniques:
Paint your nails with your preferred polish and dry them. Take a detail brush in hand and outline each nail with glitter polish like you’re drawing in a reverse coloring book. Outline the edges, tips, and even the middle to highlight the nail length. Top it off with a glossy top coat to seal in the sparkle and shine!
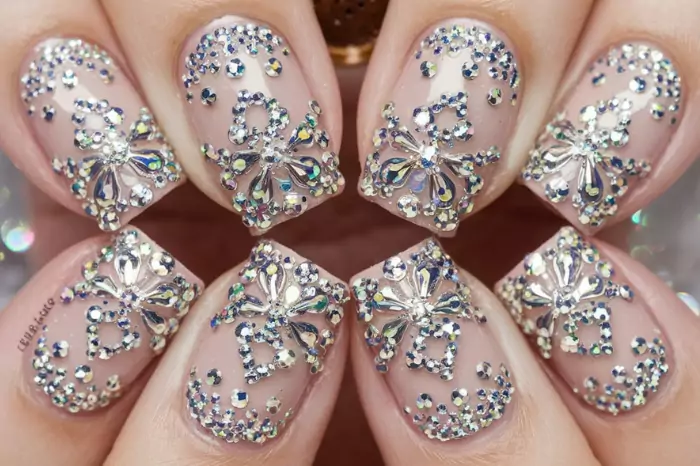
9. Razzle Dazzle Glitter
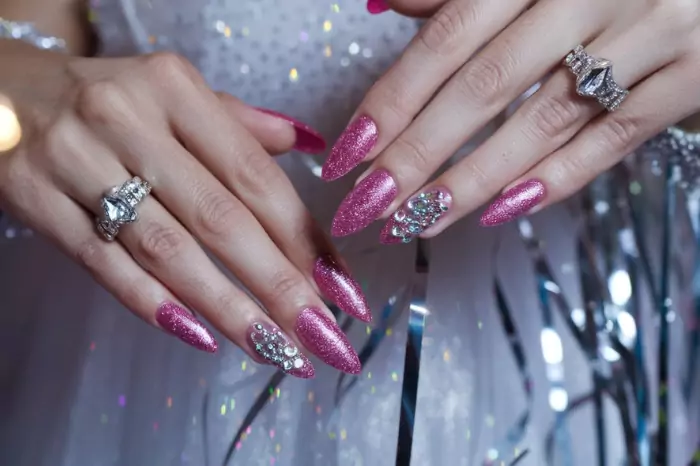
The ultimate power duo. The Superman and Batman pair. You can never go wrong with rhinestones on top of glitter. The sparking nails can reflect better than a 90s disco ball, especially if they’re pink glitter birthday nails. It’s a perfect nail idea for your 21st birthday when you’re becoming a legal adult and entering a new chapter of life.
Materials:
- Base Coat
- Nail Polish Of Your Choice
- Fine Glitter or Glitter Polish
- Rhinestones (obviously)
- Tweezers
- Gem Gel
- UV Light
- Clean-up Brush
- Top Coat
Techniques:
Begin with a base color on your nails and dry it. Then, add some sparkle in the form of glitter polish or fine glitter, finishing with a glossy top coat that seals the shine. Apply the gem gel in the areas you want the rhinestones, set the gems with tweezers, and cure it with the UV light for a breathtaking, long-wearing finish! Do note that you need a UV lamp specifically for this glitter birthday nail design.
10. Half and Half

The classic half-creme, half-glitter look is the epitome of your duality—strong yet elegant, understated yet eye-catching. With impeccably matched colors and a blinding glitter contrast, this style makes a statement and leaves a lasting impression.
Materials:
- Base Coat
- Nail Polish Of Your Choice
- Fine Glitter
- Nail Vinyl or Striping Tape
- Clean-up Brush
- Top Coat
Techniques:
Paint a rich polish on your nails and let it dry. Then, apply a quick-dry top coat and add your vinyl diagonally. Follow up with a brush of clear polish before dipping your nail in sparkling glitter and sealing it with a glossy top coat for a dramatic finish!
Special Tip For Nail Care
Hydrate and Oil: Don’t forget to give your cuticles some TLC by applying nail oil regularly since acetone is a nasty little moisture stealer that will leave your nails brittle and dry.
Never Buff: If you’re not a frequent acrylic nail user, over-buffing your nails before each manicure is a definite mistake. It may seem beneficial initially, but it can weaken your nails, increasing the risk of chipping and breaking.
Always Use a Base Coat: A base coat is like your nail’s bodyguard. It’s essential to maintain their flawless appearance by protecting them from ugly stains. A peel-off base coat is highly practical when it comes to glitter nails.
Conclusion
Glitter birthday nails aren’t a trend; they are a party for you. With each sparkle, they encourage you to shine bright on your birthday. Go ahead! Light up the world with these glitter nail ideas because you deserve nails as bright as your personality.


